|
Go to the Apple menu ,
and then to the Control Panels. Find the control panel named PPP. ,
and then to the Control Panels. Find the control panel named PPP.
This dialog box is what you will see when you open PPP (see
window below).
Ensure the "Registered User" radio button is selected.
In the NAME field, enter your login (user) name in lowercase
(do not add @cvc.net, and make sure the name is entered in lowercase). In the PASSWORD field,
enter your password for our system
(make sure the password is entered in lowercase).
In the NUMBER field, enter your CVC Internet
dial-in number.

Assuming everything has been set up correctly, you should be able to
click
on the Connect button and connect to our server. |
- Step
2 - Browser/Mail Configurations -
1.) To begin setup, double-click on Netscape Navigator's
icon on the desktop.
(You Do Not Need An Internet Connection established, to complete
these instructions).
2.) When the Netscape browser window opens, click on the Options menu
(located at
the top of the Netscape's browser window), and select General Preferences
from the submenu.
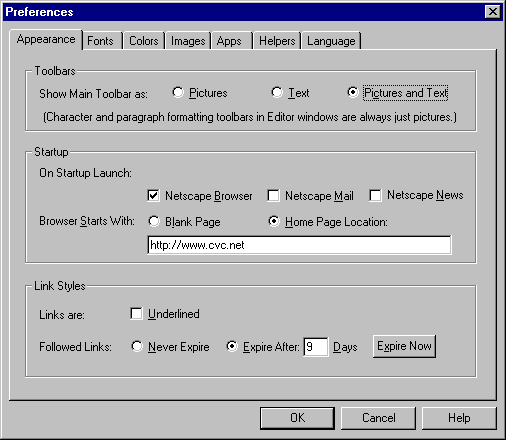
3.) At the top of the Preferences screen, click on the Appearance
tab.
4.) In the Appearance screen, insert the following:
- In the Toolbars section, Show Main Toolbar as: select Pictures
and Text
- In the Startup section, On Startup Launch: select
Netscape Browser
- In the Startup section, Browser Starts With: select Home
Page Location, and type
http://www.cvc.net in the Home Page box (in the white box
underneath Home Page Location).
- Link Styles section, is optional settings.
At the bottom of the Preference window, Appearance screen, click the OK
button.
(Refer to Example N-1)
Example N-1

5.) Next click on Options menu (at the top of Netscape's browser
window), and select
Mail and News Preferences in the submenu.
6.) At the top of the Mail and News Preferences window, click on the Servers
tab.
7.) In the Servers screen, insert the following:
- Outgoing Mail (SMTP) Server: mail.cvc.net (lower case, no spaces)
- Incoming Mail (POP) Server: mail.cvc.net (lower case, no spaces)
- Pop User Name: user name (the user name for your CVC Internet
dial-in,
in lowercase, and no @cvc.net).
- Mail Directory: Do Not Change, this will list the default setting.
- Maximum Message Size: None
- Messages are copied from the server to the local disk, then: Select
removed from
the Server.
Check for Mail Every: 10 Minutes.
In the News section enter in the following:
- News (NNTP) Server: news.cvc.net (lower case, no spaces)
- News RC Directory: Do Not Change, this will list the default setting.
- Get: 100
(Refer to example N-2)
Example N-2

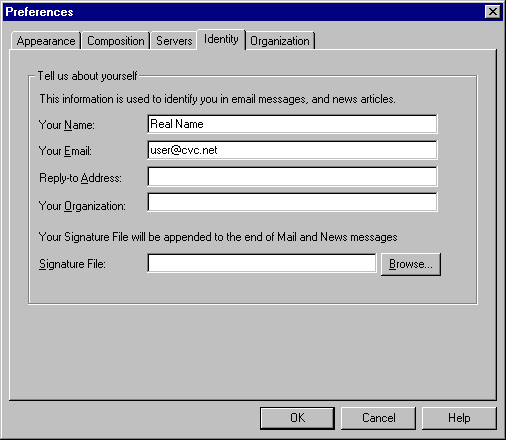
8.) Next, select the Identity tab, at the top of the Mail and News
Preferences window
(next to the Servers tab).
9.) Enter the following information in the appropriate sections:
- Your Name: Your real name.
- Your E-mail: user name@cvc.net (lower case, no spaces)
- The other sections are optional.
Click OK at the bottom of the Preferences window.
(Refer to Example N-3)
Example N-3

Your Finished! For help in making an Internet connection, please refer to
CVC Internet's Help Guide, How to Connect to the Internet. To learn how to use
Netscape for browsing and e-mail, please refer to the Help menu within the
Netscape program.
Please Note: Once your browser and e-mail are working correctly, Do
Not Change Your Settings. Changing your settings can cause you problems!
NETSCAPE CACHE - Version
3.01
To keep Netscape Navigator running at it's best, make sure to periodically
clean the disk & memory cache. The cache stores graphics of sites you browse
on the Internet, so the next time you revisit the site it will load the page
much faster. But after extensive browsing the cache will become plugged, causing
problems with browsing and e-mail.
To clean the disk & memory cache, follow these steps:
- Open Netscape Navigator.
- Click on the Options menu (at the top of the Netscape's browser
window), and select Network Preferences.
- In the Network Preference window, select the Cache tab.

- Click on the Clear Memory Cache Now button. Netscape will bring up
a window indicating this will remove all the files currently in your memory
cache. Click on the OK button.

- Next, click on the Clear Disk Cache Now button. Netscape will bring
up a window indicating this will remove all the files currently in your disk
cache. Click on the OK button.

- At the bottom of the Cache screen, click on the OK button. The
Cache tab window will take a couple of seconds to disappear. Once it has
cleared, go to the File menu at the top of the browser window, and select
close (this will refresh Netscape).
Netscape Navigator &
Communicator
- Software Technical Information -
FAQ’s Online
Database
http://help.netscape.com/faqs/download.html
E-mail:
info@netscape.com
Phone:
1-650-937-2555
Mac Help:
http://help.netscape.com/
<
BACK TO CVC INTERNET'S HELP GUIDE
Copyright © 1996-2008, CVC Internet, LLC. All
rights reserved.
Certain names, logos, designs, titles, words or
phrases on this site may
constitute trademarks, service marks or trade names
of CVC Internet, LLC.,
or other entities which may be registered in certain
jurisdictions.
This
web site contains links to other Internet sites, and
such links are not
endorsements of any products or services of such
sites, and no information
in
such Internet sites has been endorsed or approved by
CVC Internet, LLC.
CVC
Internet, LLC disclaims any responsibility, if some
web site you link
to has material on it that offends you in any way.
If problems or
questions arise with the use of any of the linked
web sites, please
contact the company that owns or operates the
Internet site.
|


