Resetting Outlook
2002
Configurations for CVC Internet
Please Note: These
instructions are for users
who have experience setting up software programs.
If you
notice a difference in setup windows, please take the general
information listed below and apply them in the appropriate windows.
********************************************************************
DO
NOT MAKE ANY OF THESE CHANGES,
WITHOUT YOUR WINDOWS OPERATING SYSTEM CD/DISKS
*******************************************************************
If an account has already been set up use this method to "reset" your Email Account.
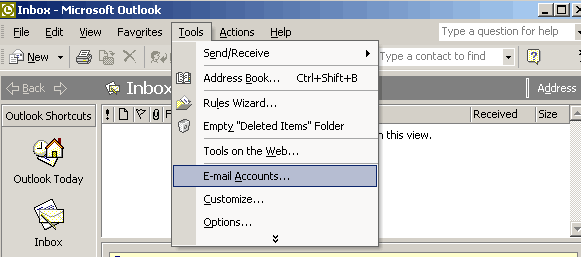
1.) Open Outlook. In the
Outlook window, click on the "Tools" menu (located at the top
of the Outlook window) and select "Email Accounts" (example
screen below).
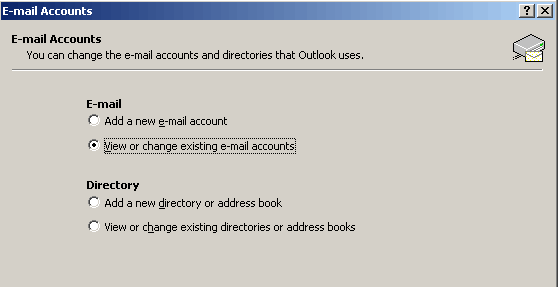
2.) In the next screen "Email
Accounts", select "View or change existing e-mail
accounts" in the "E-mail" section (example screen below),
then click the "Next" button.
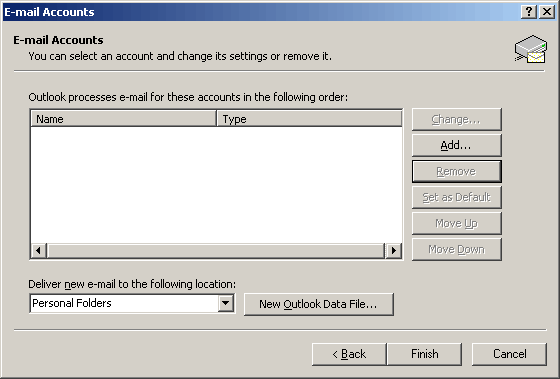
3.) In the next screen "Email Accounts", if another account is in the "Name/Type" field that is not being used, or if you are "resetting" your account in Outlook, click on the "Remove" button, then click "Add".
Please Note: If you wish
to keep the current account shown in the "Name/Type" field and add a
secondary e-mail account, disregard the "Remove" button and
only click on the "Add" button.
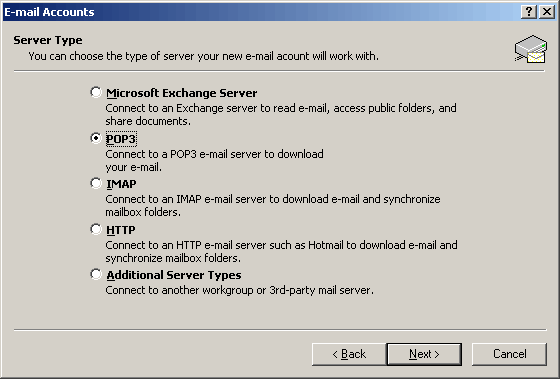
4.) In the "Server
Type" screen, select "POP3", then click on the "Next"
button (example screen shown below).
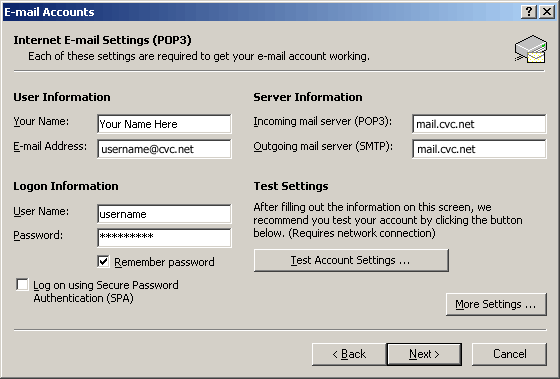
5.) In the "Internet E-mail Settings (POP3)" screen, enter the following (sample screen below):
-
"User Information, Your Name" field, enter: your real name or business name.
-
"User Information, E-mail Address" field, enter: your CVC Internet e-mail address (example - username@cvc.net). Make sure to enter the address with no spaces and in the character case assigned to your account - such as all lowercase.
-
"Server Information, Incoming mail server (POP3)" field, enter: mail.cvc.net (lowercase, no spaces).
-
"Server Information, Outgoing mail server (SMTP)" field, enter: mail.cvc.net (lowercase, no spaces).
-
"Logon Information, User Name" field, enter: your CVC Internet user name (do not enter your e-mail address, and make sure to enter the name in the character case assigned to your account - such as all lowercase).
-
"Logon Information, Password" field, enter: your CVC Internet password (make sure to enter the name in the character case assigned to your account - such as all lowercase).
After these settings are complete,
click the "Next" button.
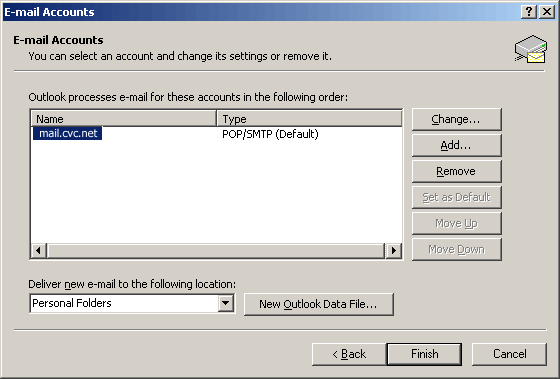
6.) In the "Email Accounts" screen, your "Name/Type" field, mail.cvc.net should be shown for the "Name" and POP/SMTP (Default) should be shown for the "Type" (sample screen below).
Please Note - Regarding multiple mail accounts: If your CVC Internet mailbox is a secondary mailbox, (default) will show for the first account in the "Name" field. To change the default setting from the first mailbox to the second mail account, click on the second "Name" and then click on "Set as Default".
After checking these settings, click on the "Finish" button.
Your done! For
information on using e-mail, please refer to the "Help Menu" located
within the software program.
Microsoft Products
- Software Technical Information -
FAQ’s Online Database
http://support.microsoft.com/directory/
Phone:
1-425-635-7222 (Windows 98/2000)
Phone:
1-425-635-7000 (Windows 95)
Phone:
1-425-635-7123 (Internet Explorer)
Phone:
1-425-637-9308 (Microsoft Programs)
Copyright © 1996-2004, CVC Internet. All rights reserved.
